|
|
Query |
The Query tool is a powerful tool that allows you to run a database query on various data layers to find features of interest. It is perfect for answering what, where, how many, and how much questions. For example, if you need to determine how many surface estate acres of land are patented to Alaska native village corporations within Kanuti National Wildlife Refuge, you can use the Query tool to find the answer.
The Query tool has many settings and options. Be sure to spend some time exploring all the various functions. Below is a step-by-step illustration of performing the query mentioned above.
How it Works
Using the Query tool is a two-step process: you first specify the data layer that you want to query, then you identify the search criteria in which you are interested. You can then interact with the query results by viewing the resultant features on the map, viewing details in the attribute table, calculating statistics, or exporting the attributes of the selected feature into several formats for use outside of the Mapper.
The power of the Query tool lies in the specification of your search criteria. Refer to the illustration below:
![]()
The Visitor Facilities layer is selected, and is ready for specifying the query criteria
You can see in the above example that the Visitor Facilities layer has been selected as the layer upon which the query will be conducted. The various search criteria pick lists allow you to specify the criteria that you want to use in the query. You can specify as many criteria as you wish, in any order you wish. When you pick a value from a search criteria pick list, that value will be used to narrow down the values that will appear in the other pick lists. This process is cumulative, meaning that the first value you pick will narrow down the values in the other pick lists. When you then select another value from a second pick list, your chosen values from both the first and second pick lists will be used to narrow down the results of the remaining pick lists. For example, assuming you have picked values from four pick lists, the combination of those four values are used to narrow down the values in any remaining empty pick lists. This is a very powerful and intuitive method for performing queries, particularly if you are not already familiar with the attribute values of the data layer that you are querying. The following example illustrates this functionality.
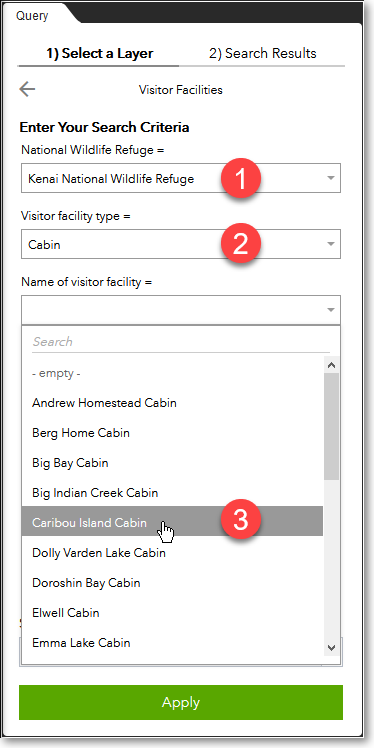
Query criteria applied to the Visitor Facilities layer
In the above example, three search criteria have been specified. In this case, the user first selected Kenai National Wildlife Refuge (#1), then clicked on the Visitor Facility Type pick list. This pick list then showed all the various types of visitor facilities within only Kenai NWR, from which the user selected Cabin (#2). The visitor facility name pick list then presented a list of all the cabin names within Kenai NWR, and the user has selected the Caribou Island Cabin (#3). After specifying all of your desired search criteria, click the Apply button to perform the query.
It is important to note that your queries can be as general or specific as you desire, and your search criteria can be specified in any order. For example, if you want to see all the types of visitor facilities that are within Kenai NWR, you would first specify Kenai NWR , then click on the Visitor Facility Type pick list to see a complete list of all the types of facilities within Kenai NWR. Alternatively, if you want to see which National Wildlife Refuges have cabins, you would first select Cabin from the Visitor Facility Type pick list, then click the National Wildlife Refuge pick list to see a list of all refuges that have cabins.
There are three main ways in which you can use the Query tool:
Attribute query: specify search criteria for one data layer
Interactive query: draw a shape on the map to find information about the selected data layer
Spatial query: specify search criteria for one data layer and further filter the results based on a second data layer
Each of these methods is illustrated in the tutorials below.
Getting Started
1) Click the More... icon on the left-hand side of the Mapper window.
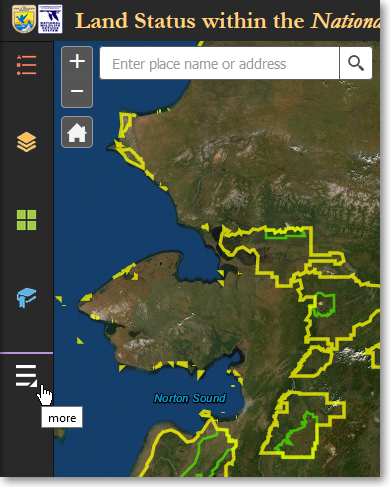
Click More... to access additional tools
2) Click the Query tool.
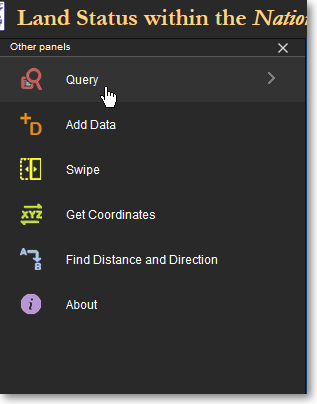
Click the Query tool
Attribute Query Tutorial: Find parcels that meet certain criteria and determine acreage
In this tutorial, you will calculate the acreage of surface estate land that is patented to Alaska native village corporations within Kanuti National Wildlife Refuge. You will first perform a database query to select the parcels that meet your criteria. You will then examine the statistics of the selected parcels to determine the acreage. Finally, you will export the information for the selected parcels into CSV format for use with other programs outside of the Land Mapper.
Stage 1: query the database to select parcels
1) With the Query panel open, under 1) Select a Layer, click on the NWR Surface Estate (Patented) layer. This layer contains all of the surface estate that has been patented within all 16 of the National Wildlife Refuges in Alaska.
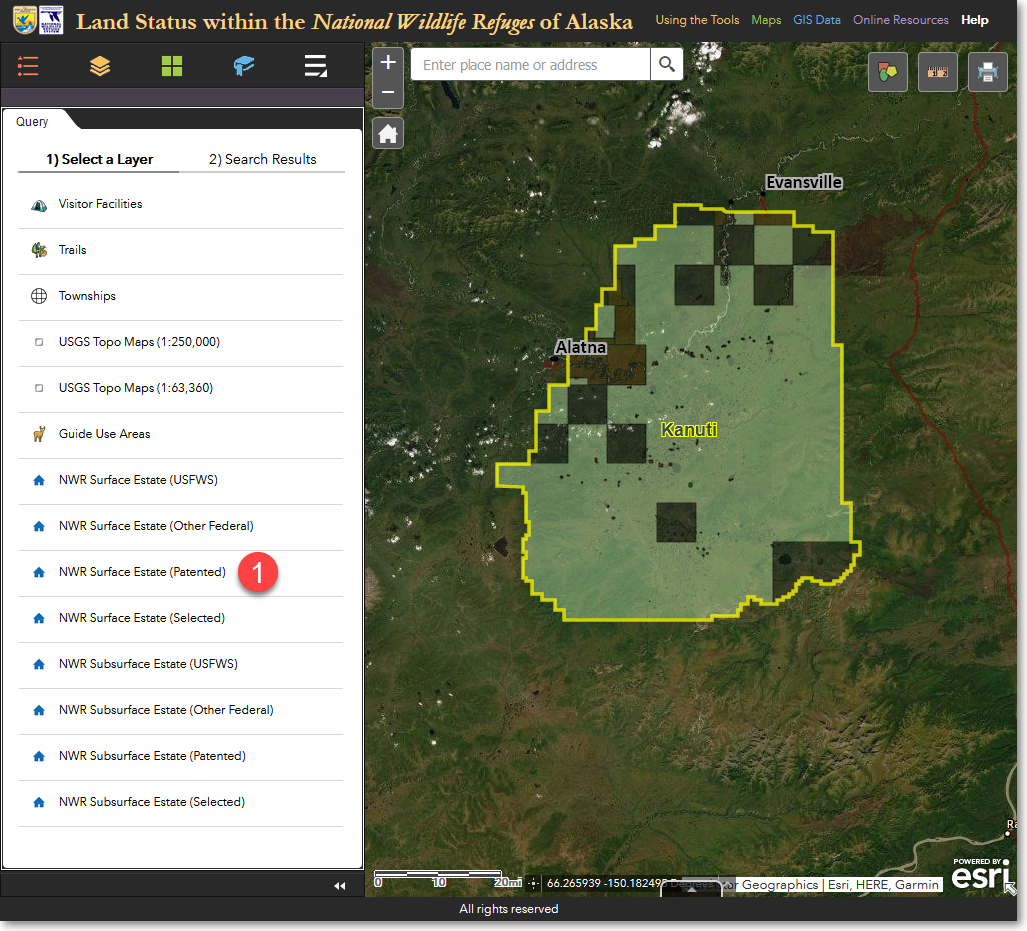
Click the NWR Surface Estate (Patented) layer
2) You now need to search for land that has been patented to Alaska native village corporations within Kanuti National Wildlife Refuge. Specify your search criteria as shown below, then click Apply.
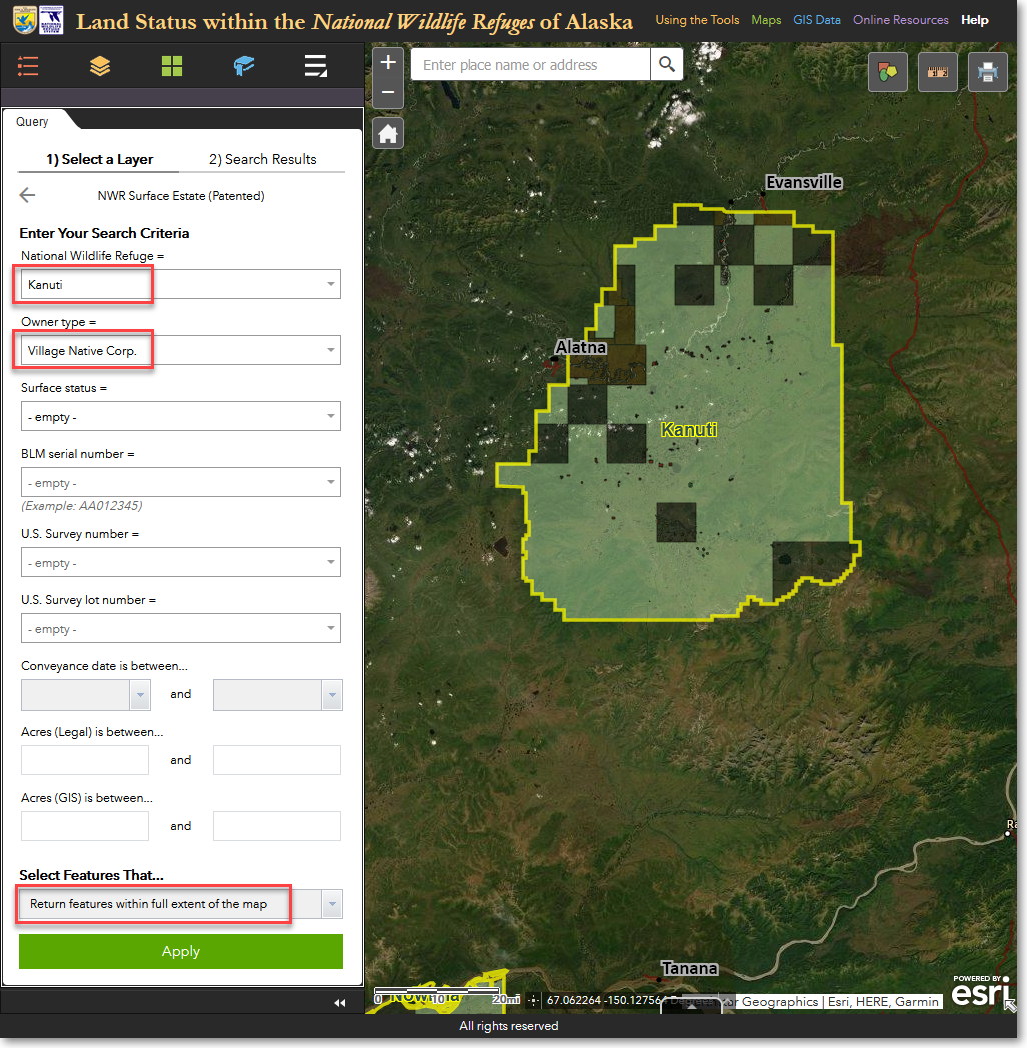
Enter the criteria shown above and click Apply
3) The query is run and the search results indicate that 11 features were found. You can scroll through the list of features in the results list. If you want to see the patent document for a feature, click the link to the right of the Convey # field name.
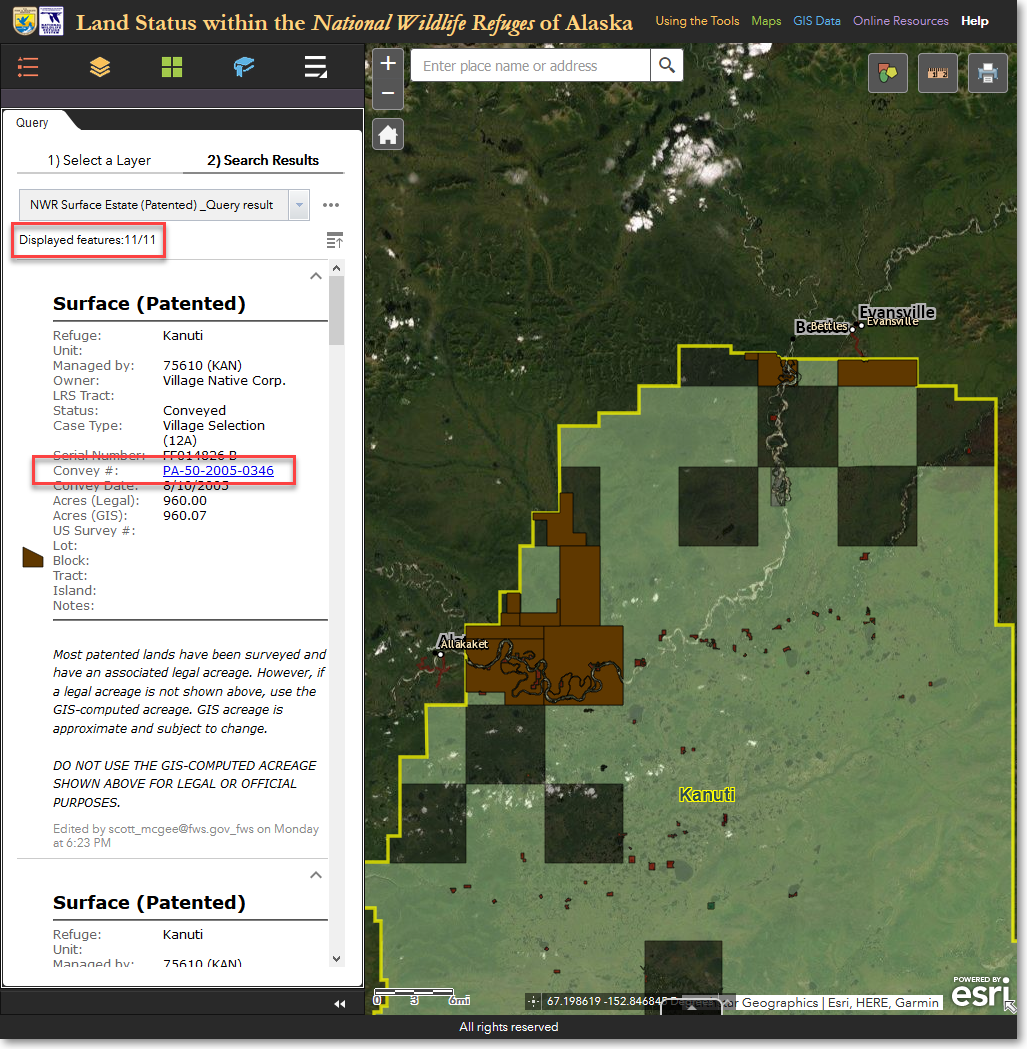
The query is run and the results are shown in the search results list
4) If you want to see a where a particular feature is located on the map, click anywhere on a search result in the results list. The map will then zoom to the feature and highlight it with a cyan-colored outline, and display the feature's associated info pop-up window.

An individual feature within the selected set of 11 features is highlighted on the map
Stage 2: determine total acreage of the selected features
5) You now need to determine the total acreage of the selected features. The result will be the acreage of surface estate land that is patented to Alaska native village corporations within Kanuti National Wildlife Refuge. Under the 2) Search Results heading, click the Feature actions menu (three horizontal dots). From the pop-up menu, click Statistics.
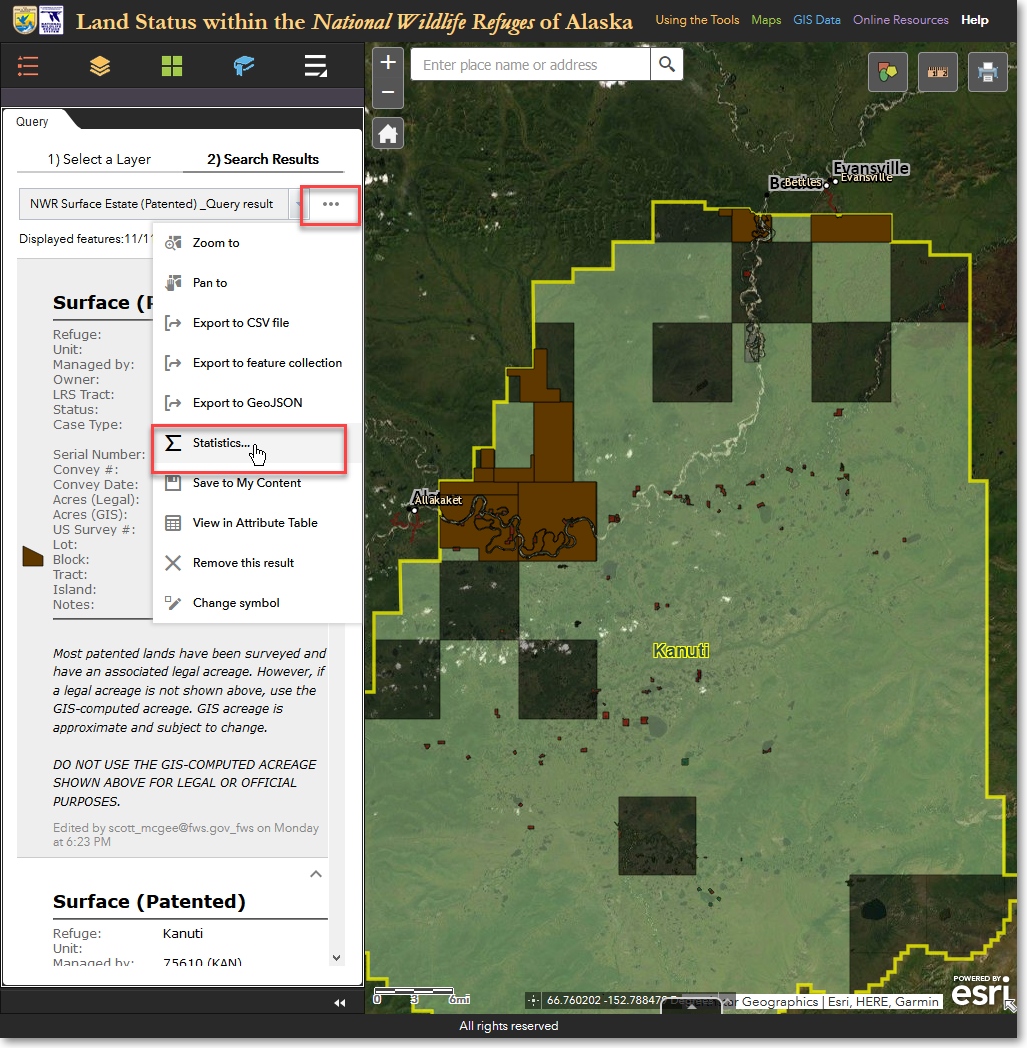
Click Statistics to determine the total acreage of the 11 features that were selected by the query
6) Now display the total acreage of the 11 features that were selected by the database query. In the Statistics pop-up window, select the Acres (Legal) field. Various statistics will be calculated and displayed. The Sum of values (71,530.19) is the acreage that you are interested in. This is the answer to your original question of how many acres of surface estate land are patented to Alaska native village corporations within Kanuti National Wildlife Refuge.
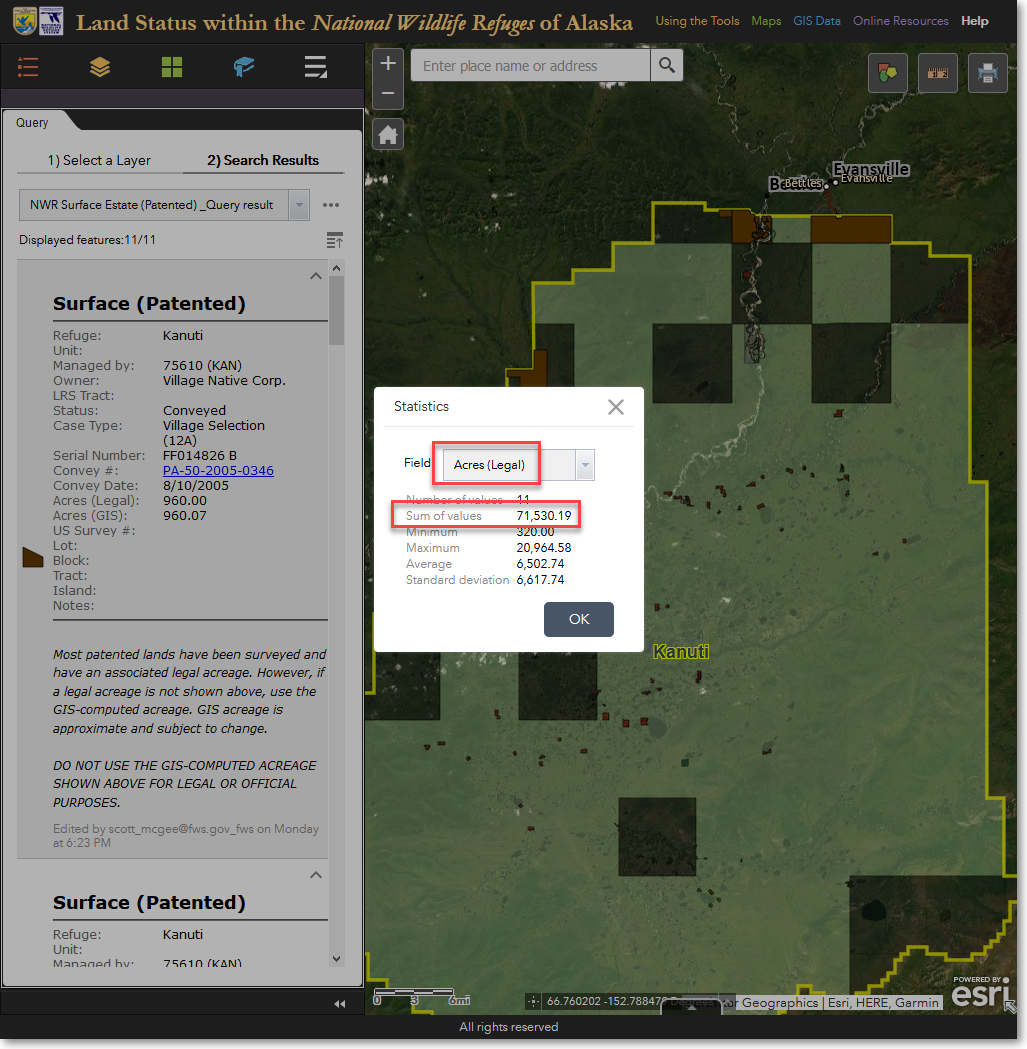
Answer: 71,530.19 acres of surface estate land are patented to Alaska native village corporations within Kanuti NWR
Stage 3: export parcel information to CSV format
7) You will now export the information associated with the selected features to a comma-separated value (CSV) file. This file can then be opened in a spreadsheet program, such as Microsoft Excel, for further evaluation. Under the 2) Search Results heading, click the Feature actions menu (three horizontal dots). From the pop-up menu, click Export to CSV file. Note that this exports only the attribute information for the selected features - the actual polygons are not included in the exported CSV file.
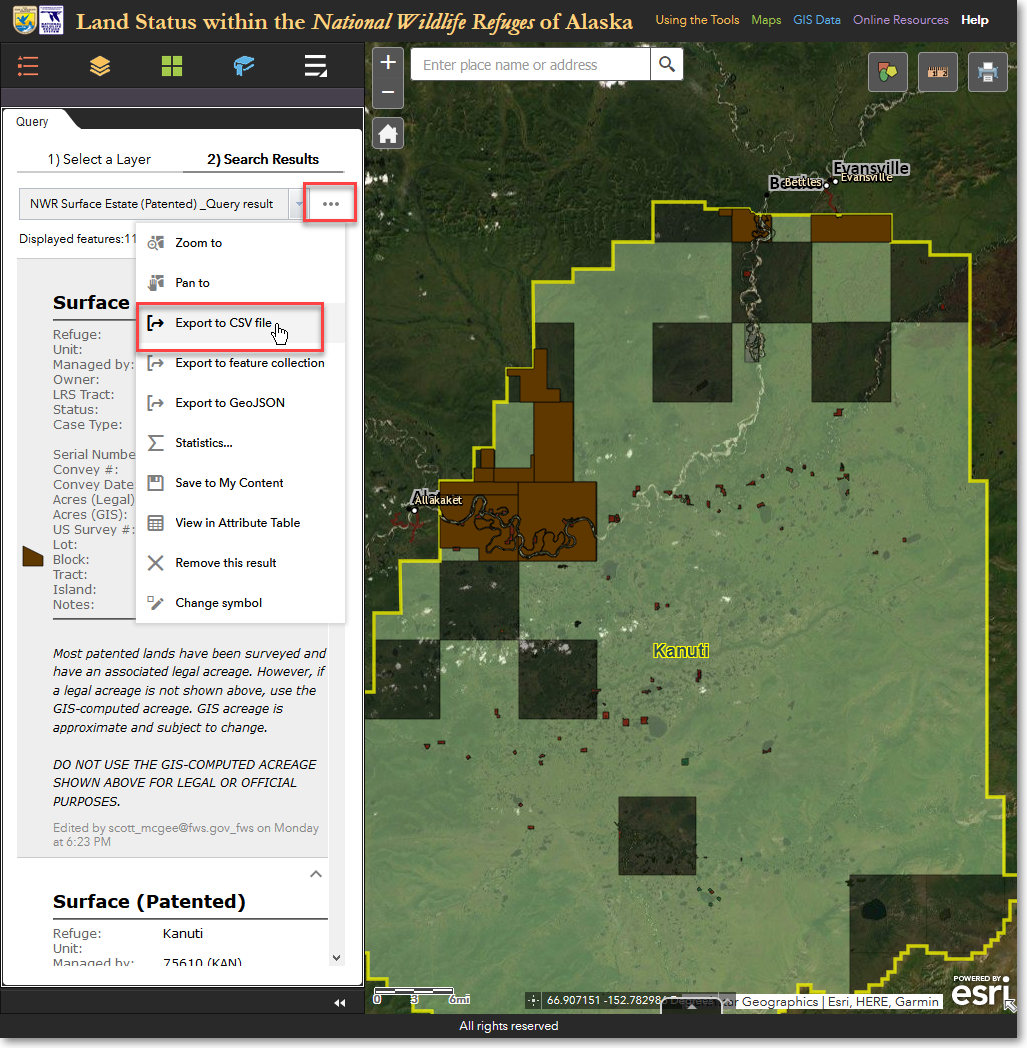
To export the information for the 11 selected features, click Export to CSV file
8) Save the CSV file to location of your choice on your computer. You can now open the CSV file in a text editor, spreadsheet, or other program that can open CSV files.
Interactive Query Tutorial: Find out information about parcels and features that you highlight on the map
In addition to performing queries based on attribute information, you can also perform interactive queries. These are queries in which you draw a shape on the map and all the features of the chosen layer that are within the shape you draw are selected. You can base the query on just the shape you draw, or you can also combine an attribute query with the shape that you draw. Below is an example of using only a drawn shape to select features from the NWR Surface Estate (Patented) layer.
1) With the Query panel open, under 1) Select a Layer, click on the NWR Surface Estate (Patented) layer. This layer contains all of the surface estate that has been patented within all 16 of the National Wildlife Refuges in Alaska.
Click the NWR Surface Estate (Patented) layer
2) Under Select Features That..., select the following option: Only return features that intersect with the shape drawn on the map.
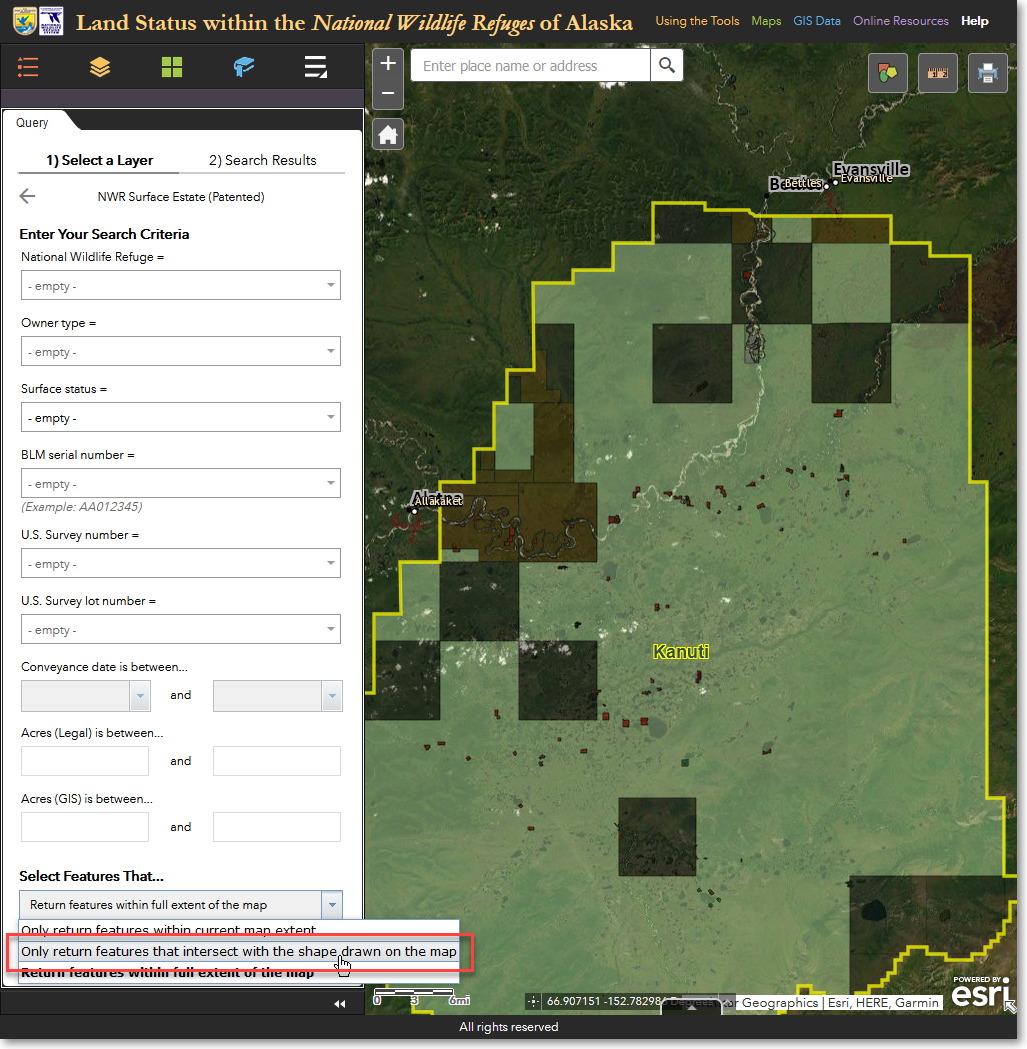
Specify that you want to select features by drawing a shape on the map
3) A set of drawing tools will be displayed in the Spatial filter section of the Query panel (you may have to scroll down). For this example, click on the rectangle shape and draw a rectangle over your desired features on the map. Then click Apply.
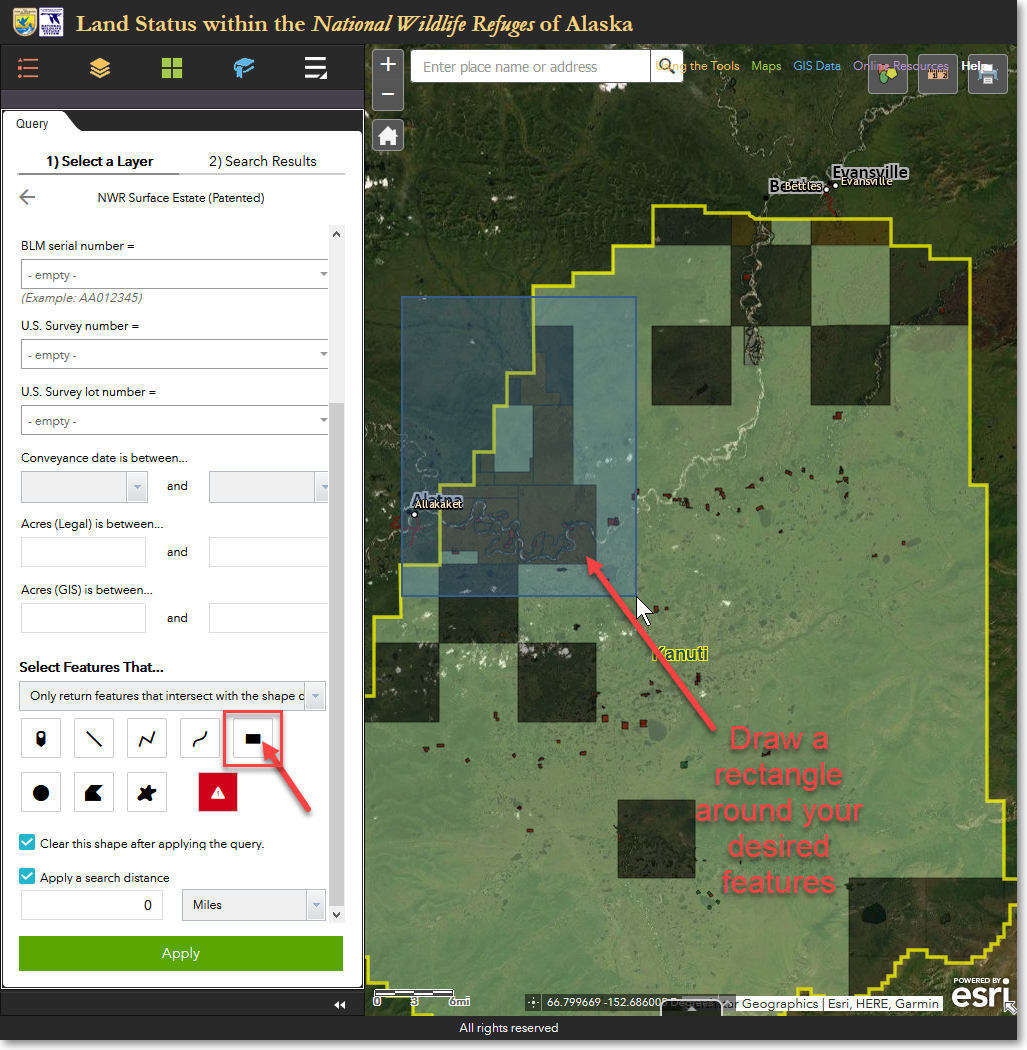
Select the rectangle tool and draw a rectangle over your desired features on the map
4) All the features of the NWR Surface Estate (Patented) layer that are either fully or partially within the rectangle that you drew are selected and drawn on the map. You can then perform other actions on the selected features, as described in the above tutorial.
5) You can combine an attribute query with an interactive, shape-based query. This would be helpful in a situation where two National Wildlife Refuges share a common boundary, and you want your drawn shape to select features within only one of the refuges. In this case, you would specify a refuge name as part of the query criteria, and then you would use the spatial filter to draw a shape on the map.
Spatial Query Tutorial: Find and report on all the types of visitor facilities within Kenai NWR wilderness areas
Assume you are in charge of maintenance at Kenai National Wildlife Refuge. Your job is to maintain all the visitor facilities within the Refuge, but with limited maintenance funds, the Refuge has to prioritize which facilities are most important. The Refuge has decided that visitor facilities within the three Designated Wilderness units should be the first priority. Your first task then is to compile a list of all facilities within the wilderness units.
Stage 1: select the first data layer of interest
1) With the Query panel open, under 1) Select a Layer, click on the Visitor Facilities layer. This layer contains all of the visitor facilities for all National Wildlife Refuges in Alaska.
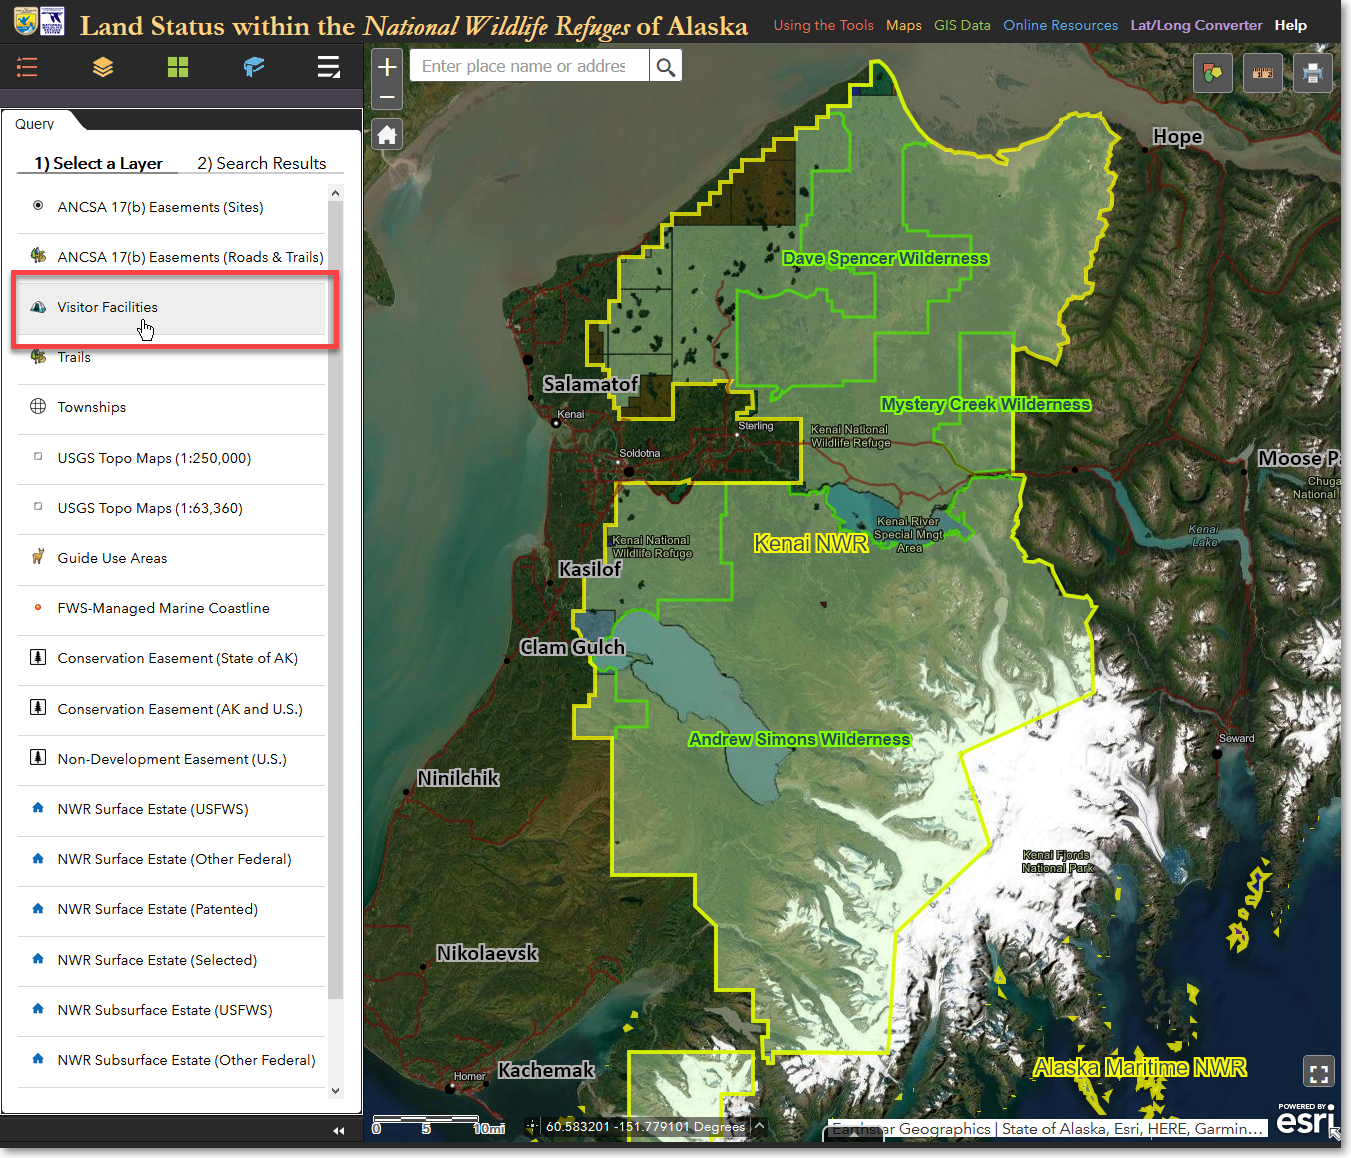
Select the Visitor Facilities layer
Stage 2: select the second data layer that will be used to further filter the first data layer
2) For this query, you don't need to specify any search criteria from the various pick lists. Scroll to the bottom, and from Select Features That..., select Only return features that have a spatial relationship with features in another layer.
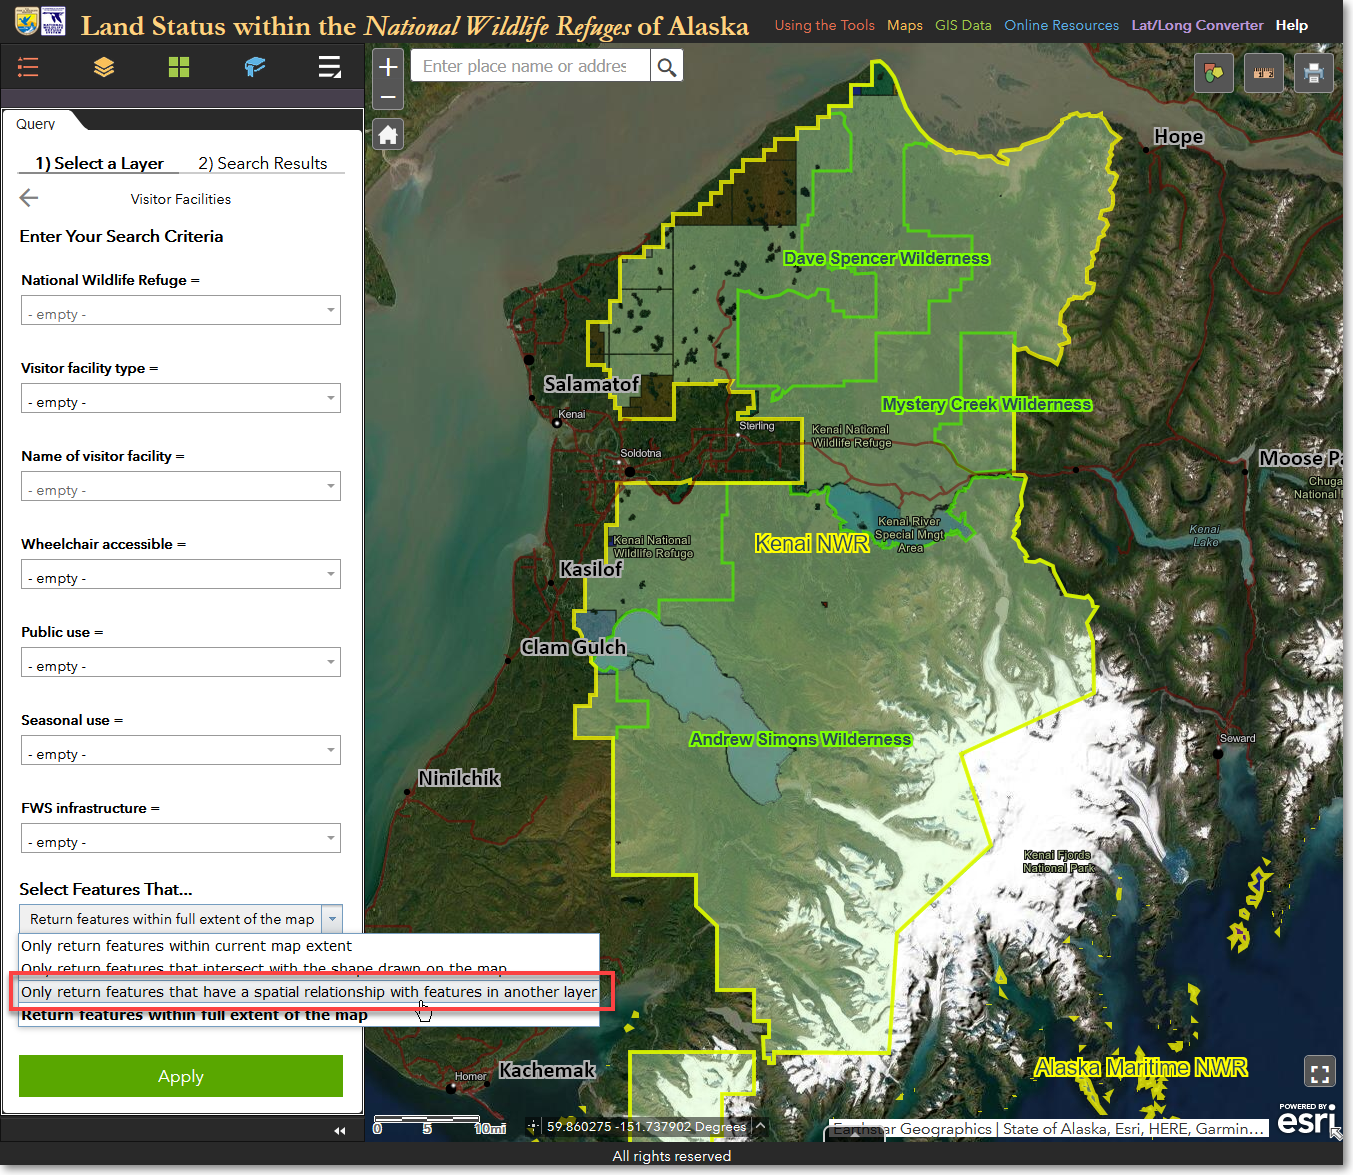
Choose the spatial relationship query method
3) If necessary, scroll down so that you can see the additional input fields. For Spatial relationship, select Is Completely Within. For Related layer, select the National Wildlife Refuge Wilderness layer. These query criteria will find all visitor facilities that are completely within wilderness areas. However, there may be some facilities that are just outside the wilderness boundaries, but yet are still associated with the wilderness units. To ensure that you find these facilities, you can apply a buffer, or search distance around the wilderness units. Doing so will find those facilities that may be just outside the wilderness units. For this tutorial, enter a search distance of 0.5 mile. Finally, specify a unique name for the results of the query. The name you specify will be the name that displays in the Mapper's Layers and Query Results panels. For the Result layer name, enter Visitor Facilities within Kenai NWR Wilderness. Your inputs should be as follows:
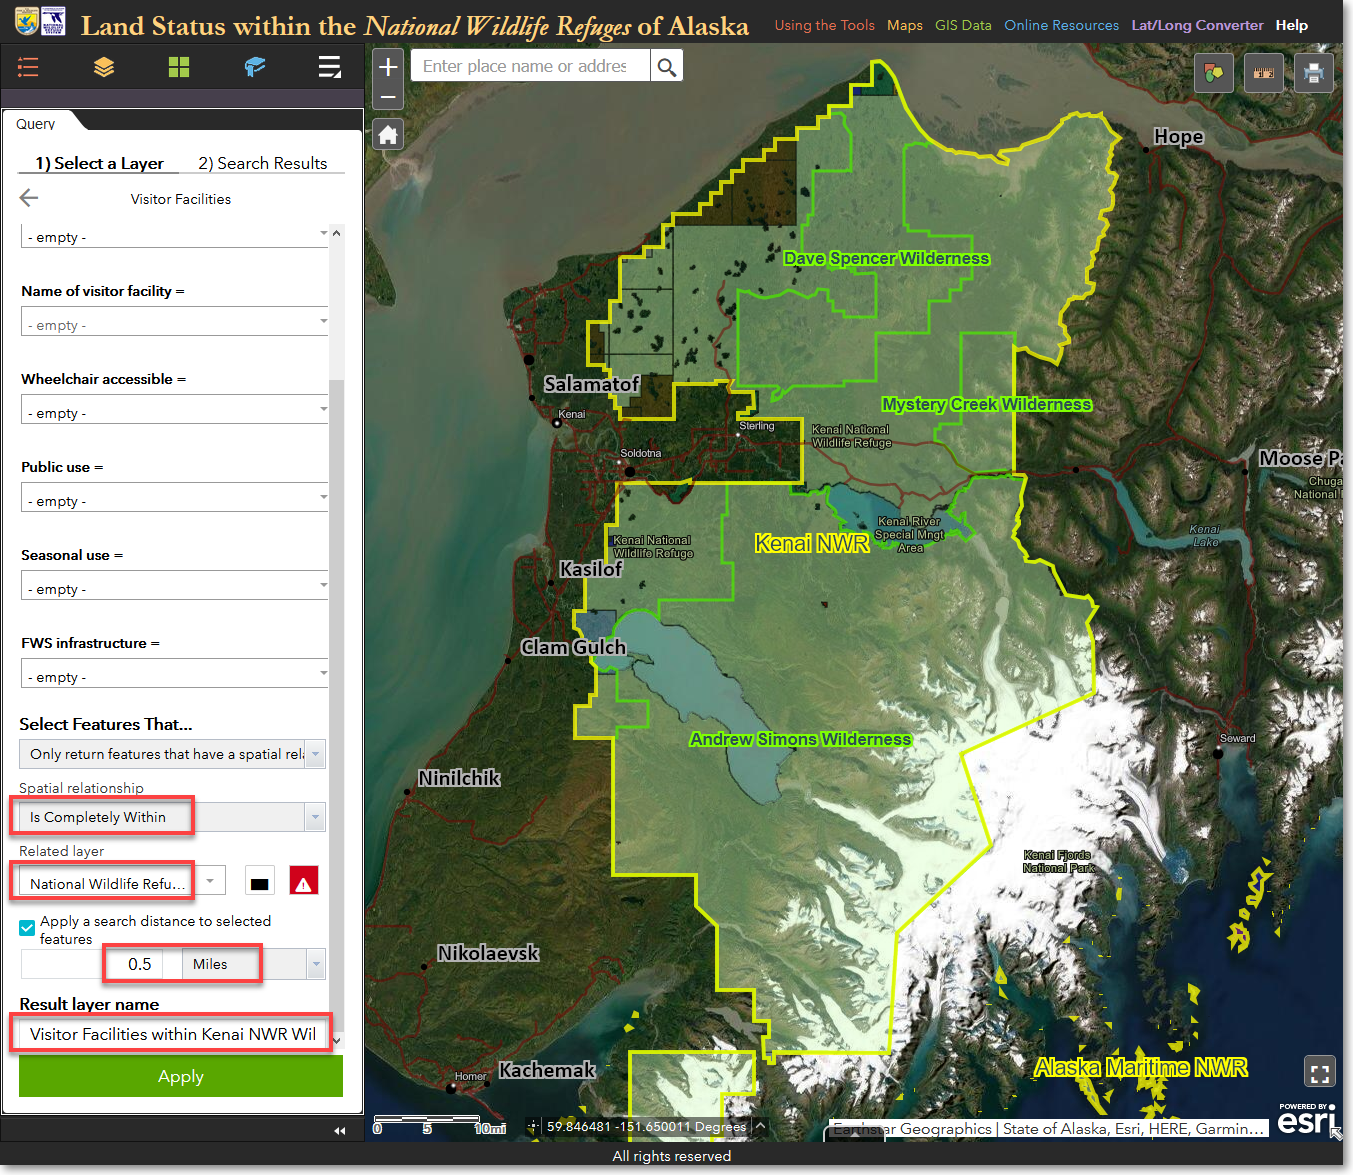
Enter additional query criteria as highlighted in red above
4) Now comes the interactive part of the spatial query. So far, the entered query criteria will query all wilderness areas within all National Wildlife Refuges in Alaska. You need to specify that you want to query only the three wilderness areas within Kenai NWR. To do this, click the Draw shapes to select features icon to the right of the Related layer pick list. Then, using the mouse, left-click within one of the Kenai NWR wilderness units and drag a box. Be sure to keep the dragged box within the boundaries of the wilderness unit that you begin with, then release the left mouse button. To select the remaining two wilderness units, click the Draw shapes to select features, but this time hold down the Shift key while simultaneously left-clicking with the mouse to draw an additional box on the next wilderness area. The three selected wilderness units will be highlighted with light blue shading, as shown below.
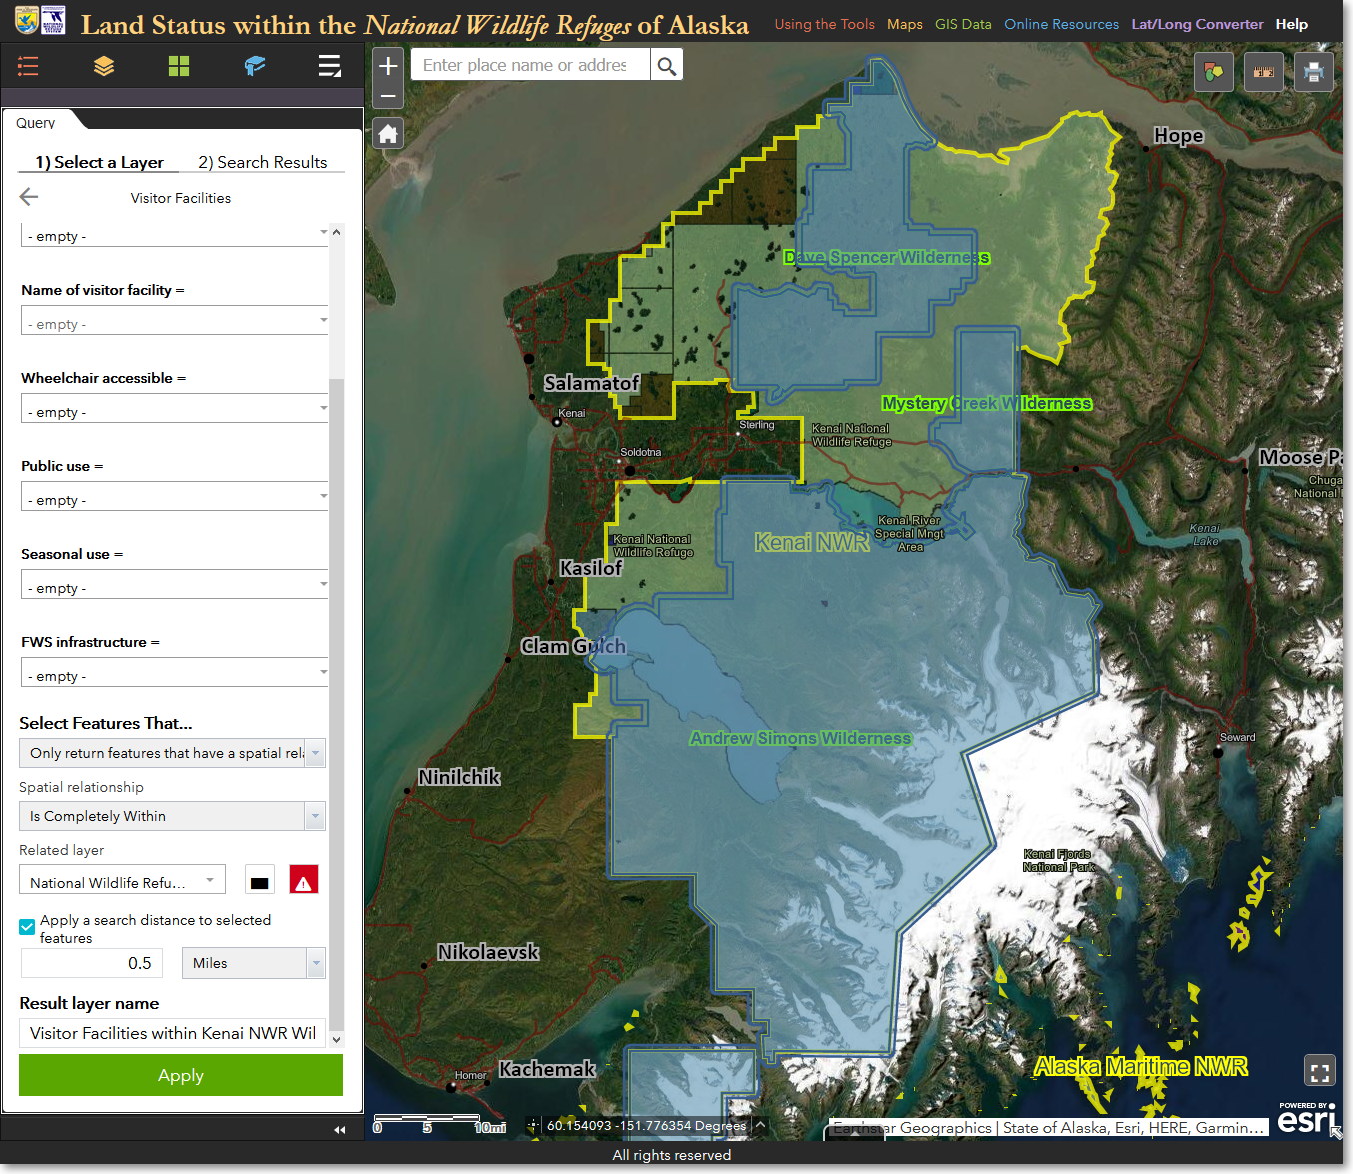
The three wilderness units within Kenai NWR are selected (blue shading) and are ready to be applied to the spatial query
5) Click Apply, and the query will run. Results show that 131 visitor facilities are within the three Kenai NWR wilderness areas.

Results of the spatial query. 131 visitor facilities are within Kenai NWR wilderness areas
Stage 3: export visitor facility information to CSV format
6) You can now scroll the list of visitor facilities, zoom and pan the map view, click individual facilities on the map, and perform additional actions accessed via the Feature Actions icon (three horizontal dots in the upper-right corner of the Query panel). In this tutorial, your goal is to generate a list of all the visitor facilities within the Kenai NWR wilderness areas. To generate this list, click the Feature Actions icon and select Export to CSV file. You can now either save the CSV file on your computer, or open it directly in an installed spreadsheet program.
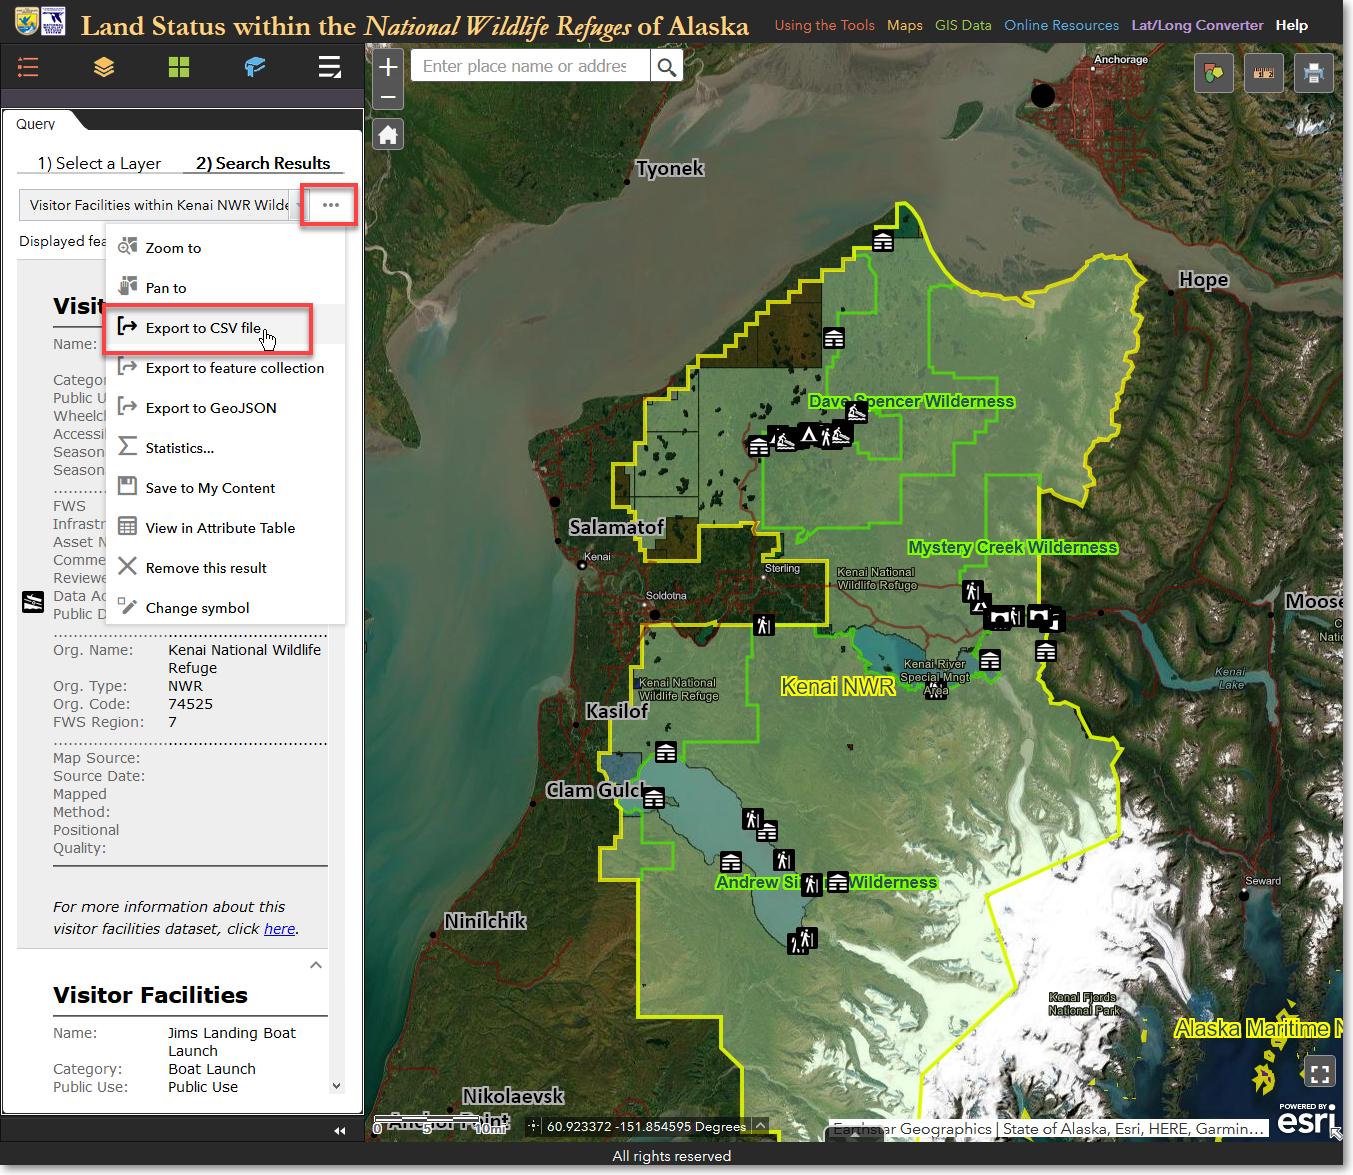
Export your spatial query results to a CSV file, which can be viewed in a spreadsheet
7) You now have a list of all the visitor facilities within the three Kenai NWR wilderness areas, along with detailed information about each facility. You can do additional sorting and analysis on the list using your spreadsheet program's features.
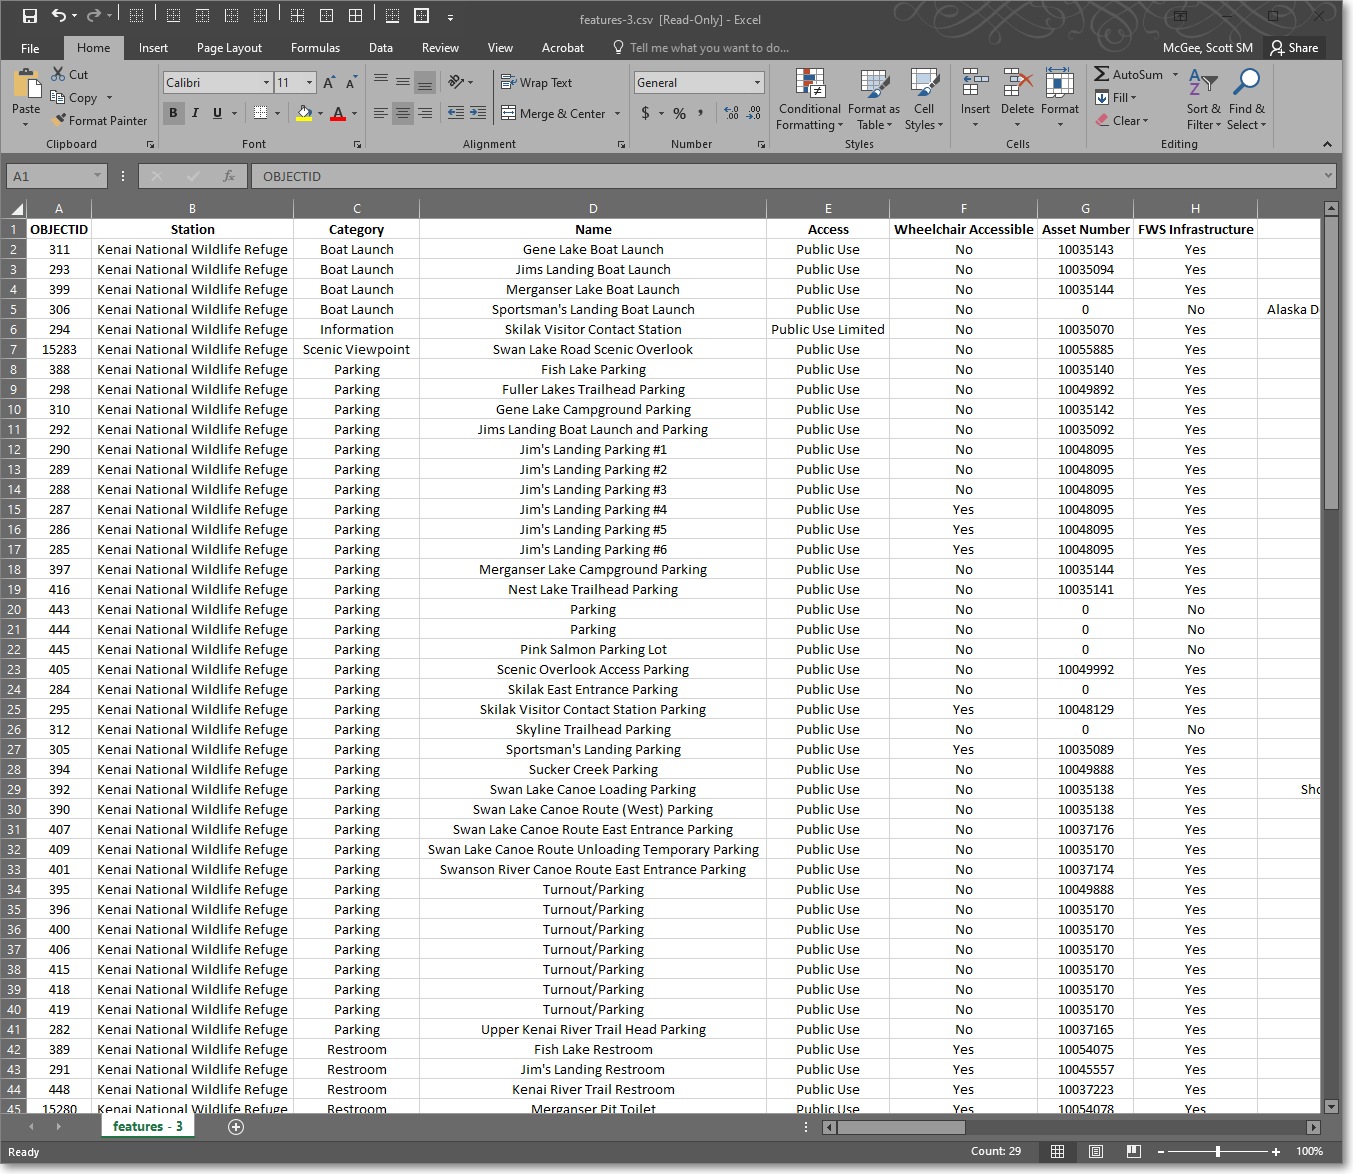
The final results of your spatial query; a detailed list of all visitor facilities within the Kenai NWR wilderness areas
The Region 7 Land Mapper was developed, and is maintained by, the U.S. Fish & Wildlife Service, Region 7, Division of Realty. Questions, comments,and suggestions should be directed to [email protected]
This page was last updated: Thursday, March 13, 2025